1.
|
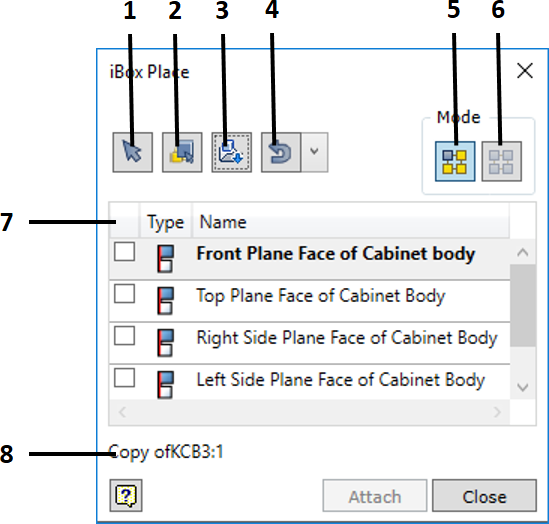
Allows selecting the iBox component already existing in the assembly and linking it to the selected interior skeleton body. An assembly may include several iBox occurrences. Only one occurrence may be linked to an interior skeleton body. This occurrence is marked with a symbol  . The following options are available: . The following options are available:
| ▪ | If the selected iBox occurrence is linked to an interior skeleton body, when selecting another body, the link will be assigned to the new body and new dimensions will be recalculated accordingly. It is necessary to keep in mind that dimensions of other occurrences of such iBox component will also change. |
| ▪ | If the selected occurrence of an iBox component is not linked to an interior skeleton body, but there is another occurrence that is linked to it, such an occurrence will be displayed based on iMate connections without changing its dimensions. |
| ▪ | If none of the occurrences of the selected iBox component is linked to an interior skeleton body, such an occurrence will be linked to the interior skeleton body. Its size will be automatically adjusted according to the size of the body. |
|
2.
|
Allows selecting the specific interior skeleton body to which the inserted iBox component will be linked. The command allows the user to directly specify planes of any interior skeleton body so that an iBox component can be linked. However, when these bodies are in contact with each other, it is difficult to specify exactly the body whose geometry is to be used to set up the link. This option allows specifying the interior skeleton frame first and then selecting the geometry exclusively for the specific body so that the iBox component can be linked.
|
3.
|
Allows selecting an iBox component from a disc location. In this case, a file selection window is opened and an iBox component is selected. Once the component has been selected, a copying options window is opened. Here, the user can define rules for naming newly copied components.
|
|
|
|
|
|
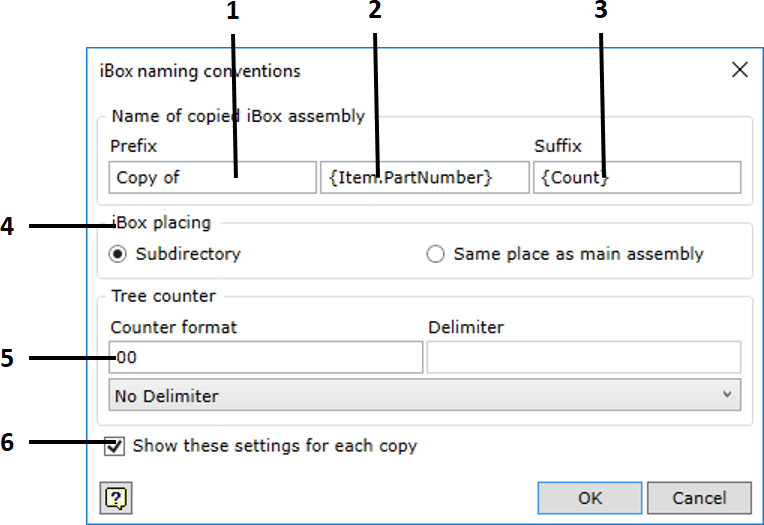
| 1. | A prefix has to be added to the file name of a copied iBox component. The prefix can include a counter keyword {Count} which means that a product with the name whose base matches the specified base will be searched in the directory in which the interior is designed. If this component is found, the counter value will be increased by one so that each iBox copy has an individual name. |
|
|
|
| 2. | A base of the file name of a copied iBox component. The user can specify the base every time they make copies of components. To do this, you will simply have to specify the name of the copy, for example, Corner cabinet. All sub-components of the iBox component will be named accordingly as if in a tree structure. So a part from iBox can be named Corner cabinet 01.ipt, etc. If you would like to avoid trouble of naming files every time you make copies, you can enter the component keyword that will be used for automatic naming. For example, if you enter the keyword {Item.PartNumber}, PartNumber field of an iProperty of the iBox component will be read. It will also be used as a base when naming copies of the iBox components. You can enter keywords that are used for the output of properties of assembly components to the specification. (specify a location where the keywords are listed). |
|
|
|
| 3. | A suffix has to be added to the file name of a copied iBox component. The suffix can include a counter keyword {Count} which means that a product with the name whose base matches the specified base will be searched in the directory in which the interior is designed. If this component is found, the counter value will be increased by one so that each iBox copy has an individual name. |
|
|
|
| 4. | The user can choose a location for saving the iBox copy: |
| ▪ | Subdirectory means that a directory will be created for each copy; the name of the directory will be the same as that of the file. The directory will be stored as a subdirectory within a directory containing the entire interior project. |
| ▪ | Same place as main assembly means that files will be copied to the same directory in which the interior assembly is stored. |
|
|
|
| 5. | Counter format used when naming iBox sub-components. For more detailed information about the functioning of a counter based on a tree counter, see here. |
|
|
|
| 6. | You can disable this option every time you insert an iBox component. In such case, iBox copies will be created based on the rules specified in this window. These settings can also be adjusted when adjusting the general system settings. |
|
4.
|
Creating and inserting the last inserted occurrence of the component. In the dropdown list, find the last five previously inserted iBox components.
|
5.
|
Single insert mode is used to insert one iBox component. This is the only stage in which an iBox component can be linked to measurements of an interior skeleton body and arranged in space. When inserting an iBox component from a disc location, this mode is set automatically.
|
6.
|
Multiple insert mode is used to create multiple occurrences of the specified iBox component and insert them accordingly with the geometry specified for iMate connections. In this case, a copy of the iBox component will not be created; only iBox occurrences will be multiplied.
|
7.
|
A list of arrangement constraints of the selected iBox component. In case of a single placement, where the geometry to which an iMate connection has to be applied is specified for the assembly, the connection will be immediately realised and the program will move on to the next iMate connection for which the geometry has to be specified. In case of a multiple placement, one or more geometric elements in the assembly can be specified for a single iMate connection. Then the user can move on to the next iMate connection by a click of the mouse and specify the geometry for this connection. Once the "Attach" button is clicked, all possible layout combinations are calculated and an occurrence of the iBox component is created for each combination.
|
8
|
The name of the inserted iBox component is displayed.
|