In this section, you will learn how to generate product specifications.
If you restart Autodesk Inventor after closing it, you will find your unfinished assembly model under the name TBL.iam in the project workspace catalogue Samples/My Table.
Open the specification generation command:
Woodwork Design –> BOM –> BOM ![]()
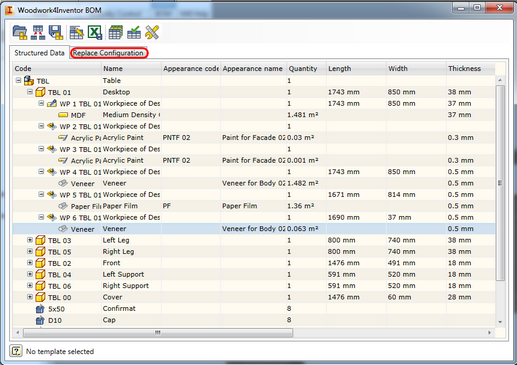
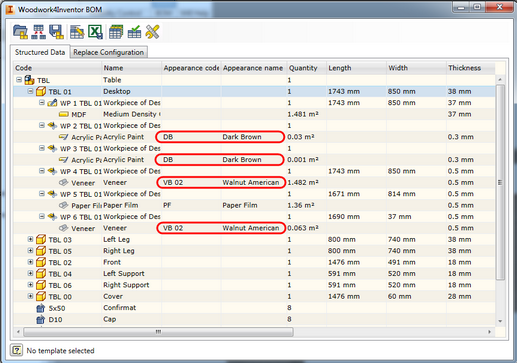
In the Structured Data window, click on the item TBL 01. Right-click to open the context menu and start the Expand selected command. You will then see an expanded composition of the TBL 01 part.
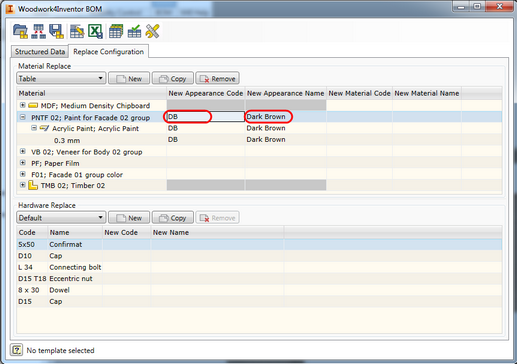
Go to the replacement and configuration window by selecting the Replace Configuration tab. A window will appear displaying a summary report of material and purchased products. Create a new replacement configuration. Click “New” and after entering a specific name, e. g. Table, click “OK”. The replacement configuration selection button shows the name Table, meaning that it is a current configuration.
|
Change the paint color properties. Place the cursor on the row in the New Appearance Code column as shown in the figure below. Then press "F2" key to switch to writing mode and enter DB value.
Follow the same steps in the New Appearance Name column and enter Dark Brown. Then press "Enter" and you will see that the entered value is automatically transferred to all rows of the current column.
|
Now, using the data in MS Excel tables, we will perform material color replacement. Enclose the PNTF02 material data contained in the column tree in brackets and extract the Veneer type VB 02 material data.
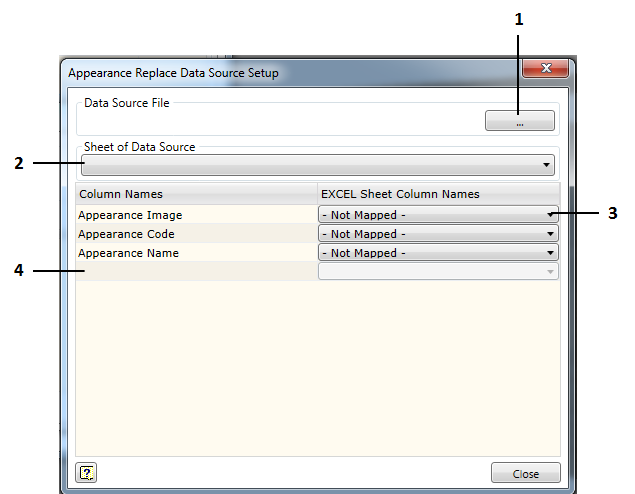
In the New Appearance Code column, double right-click to open MS Excel worksheet data display window. This worksheet is still empty because its configuration is not linked to the MS Excel data yet. Click “Setup” in the top right corner of the window. A window will appear to link MS Excel worksheet to the replacement configuration window.
2. Click the Sheet selection button and open the list of all files contained in the Materials.xls file. Then select the Materials sheet. 3. Link the data displayed in the replacement window to the data contained in the MS Excel file.
Appearance Code –> Code
4. Enter additional fields you want to see in the replacement window. a. Place the cursor on the empty field and enter your desired name, e. g. Type. Then select a MS Excel column Type for this field and press “Enter”. b. Move to the next row and enter another field – Producer. Then select a MS Excel column Producer for this field and press “Enter”.
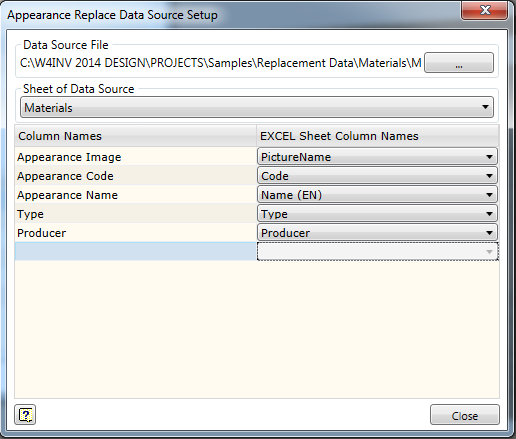
The linking process is complete. The window will display the following result:
To return to the replacement window, click “Close”.
|
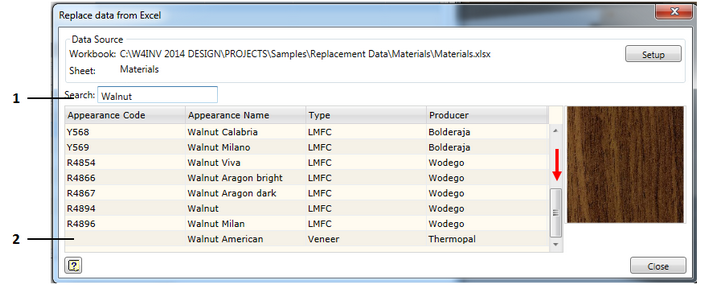
The window is already filled with MS Excel worksheet values. Now we will select a replacement item.
2. Find Veneer type item in the list and double click on it to close the window. Go back to the Replace Configuration window where you will see how the color code and the name are imported from the MS Excel worksheet to the row. Note. This field remains empty because the latter item did not have a color code in the MS Excel worksheet.
Now place the cursor on the item in the New Appearance Code column.
Double click to open replace from MS Excel window. Re-enter the word Walnut and use the Search function. Then select an item.
Double click the mouse button to return to the Replace Configuration window. Then extract the entry.
You can see that all materials having the same color are assigned with a new color code and name.
|

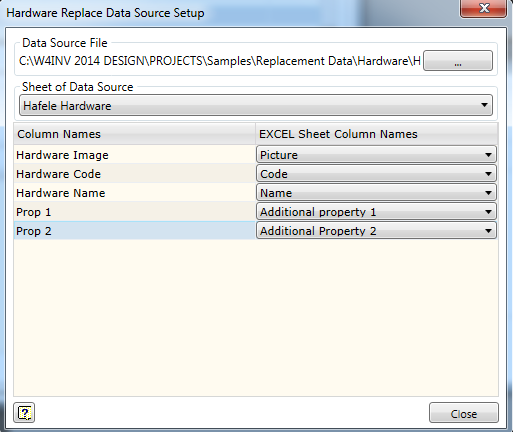
The code and name replacement of purchased products is performed in the same manner as the replacement of the color definition, thus the following explanation is provided in a shortened version. Return to the Replace Configuration window. Create a new hardware configuration. In the bottom of the Hardware Configuration window, click “New” and name the new configuration Hafele configuration. Move to the New Code column and double left-click on the entry 5x50;Confirmat. Go to the replace from MS Excel window which is currently empty. Set up a link between the replacement window and the data contained in the MS Excel worksheet and click “Setup”. Select Hafele Hardware of Furniture.xlsx. data sheet which is located at C:\W4INV 2014 DESIGN\PROJECTS\Samples\Replacement Data\Hardware. Select Hafele Hardware sheet. Set up a link between the columns displayed in the replacement window and the MS Excel columns.
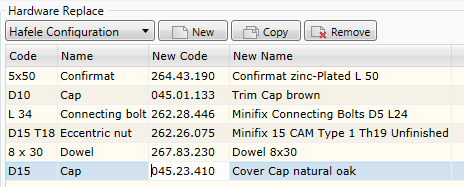
To return to the replacement window, click “Close”. Type the phrase Confirmat in the search box. You will get a filtered list containing available Confirmat hardware items. Select the most suitable one and double left-click to exit the selection window. Upon exit, the replacement values will be automatically applied to a given item. Move your cursor on the next entry and repeat the procedure above. In the Search field, enter Cap selection phrase and select D12 cap of required color. To select a screw, use the selection phrase "Connect". "Minifx" for Minifix eccentric "Dowel" for wooden dowel "Cap" for D15 cap.
|
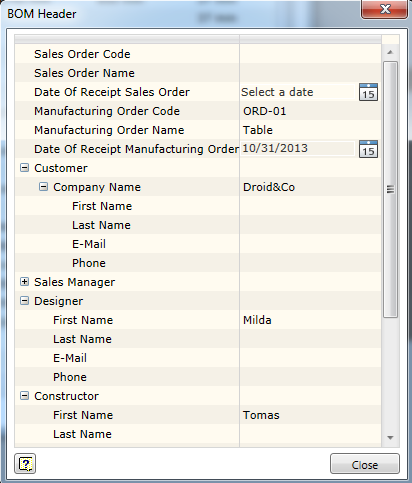
Before exporting a specification to MS Excel file, enter its header. Click the
Fill in the fields at your discretion:
Close the dialog.
|
Before importing a specification into MS Excel file, select a specification template. Click the A file selection dialog will open in which you will find a required template: C:\Users\Public\Documents\Woodwork for Inventor 2014 v5\BOM templates. Select BOM Metric (EN).xls template and open it. For the final BOM generation, click the Woodwork for Inventor offers you to select a name and a location where the MS Excel file should be generated. Finally, the system will offer you to open the generated file in the MS Excel editor.
|
To save a BOM specification in the XML format, click the |