Creating a holes note template

Top | Previous | Next


Creating a hole note template and template settings.


Hole Note Setup dialog


1.

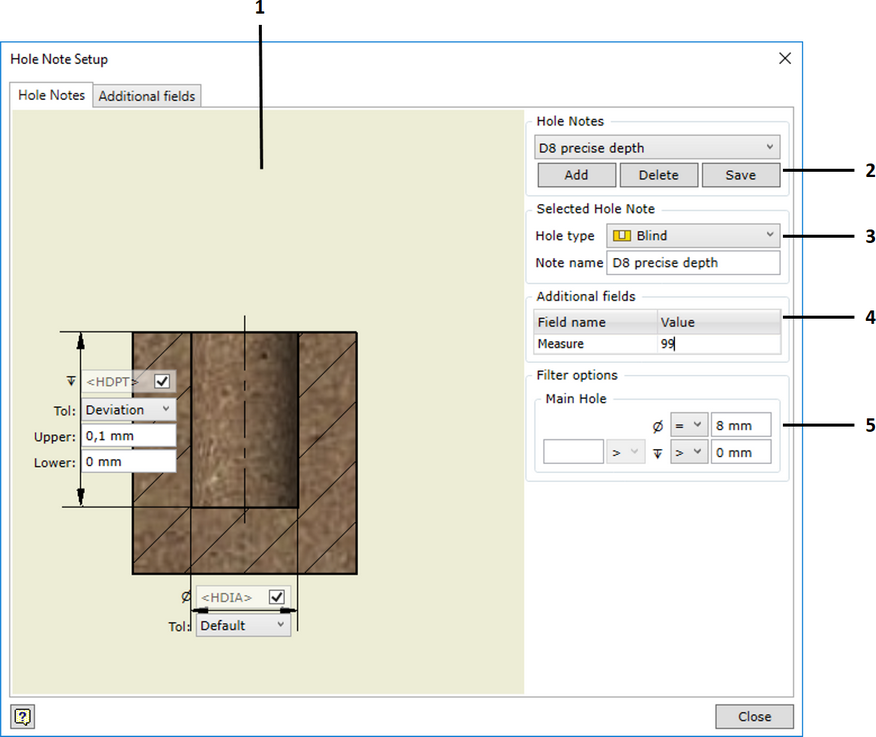
The dialog box panel is used to indicate measurements defining a hole of the selected type and the desired tolerances. Depending on the selected type, the view of the panel and the number of displayed geometric parameters changes. The desired type of hole for the given note is selected in the Hole Type field.


Values and tolerances can be defined for each geometric parameter of a hole.


Hole geometry parameter setup in Hole Note


1.Shows the value of a geometric parameter of a hole that will be used for deriving hole data into a holes table in the drawing. If actual size derived from the 3D model of the part needs to be transferred to the holes table, the box has to be ticked off. In this case we can see that the parameter value will be searched by the keyword. For more information about keywords of hole parameters and their use, please go here. If the box has not been ticked off, the user has to enter the specific value of hole parameter that will be used in the holes table.


2.Allows setting the tolerance for the value, which can be derived to a holes table in the drawing. No tolerance is assigned by default. You can set Simetric and Deviation tolerance types.


2.

Hole Notes – the panel is used to edit the created hole notes.

The drop-down list of the created hole notes allows selecting any of the existing notes for editing or deletion:

Add – creates a new blank note template.
Delete – deletes the selected hole note template.
Save – saves the changes made to the hole note template.


3.

Selected Hole Note – the panel is used for the following:

Hole Type – selecting the type of hole for which the template is created. The selection also serves as a filter. When creating notes, the template will be used only for holes of the selected type. For more information about the supported hole types, see here.
Note Name – name of the hole note given by the user; the name has to be informative and explain the purpose of the template.


4.

Additional fields – the panel can be used to define values of additional hole note fields that are entered by default.


5.

Filter options – filtering options. Here, you can set the hole filter parameters. You can indicate that the parameter has to correspond to the specific value or fall within the specified range. For example, you can set the specific diameter of the hole and the appropriate height range so that the hole is included in the set of noted holes. The number of restriction parameters depends on the selected hole type. For example, only the diameter restrictions can apply to thru holes, while height restrictions can also be provided for blind holes.