The Replace Configuration feature is designed for performing “the last minute” renaming of materials and hardware which are presented during BOM generation. Replacement combinations can be remembered as a replacement configuration which acquires a name created by the user.
During the installation of the Woodwork for Inventor add-on, the configuration has a Default status. Any configuration can be made current, supplemented or edited. When entering replacement values, all replacements will automatically be saved during your work session. The replacement configuration remembers what replacements were made to which material.
If, while working with a different assembly, the same material occurs for which a given replacement was already saved in the selected replacement configuration, such a replacement will be applied to the new assembly as well. In this way the user can collect different commonly used material replacement combinations and apply them depending on the required product realization.
A replacement window can be accessed by opening the Replace Configurator tab of the Woodwork for Inventor BOM generator .
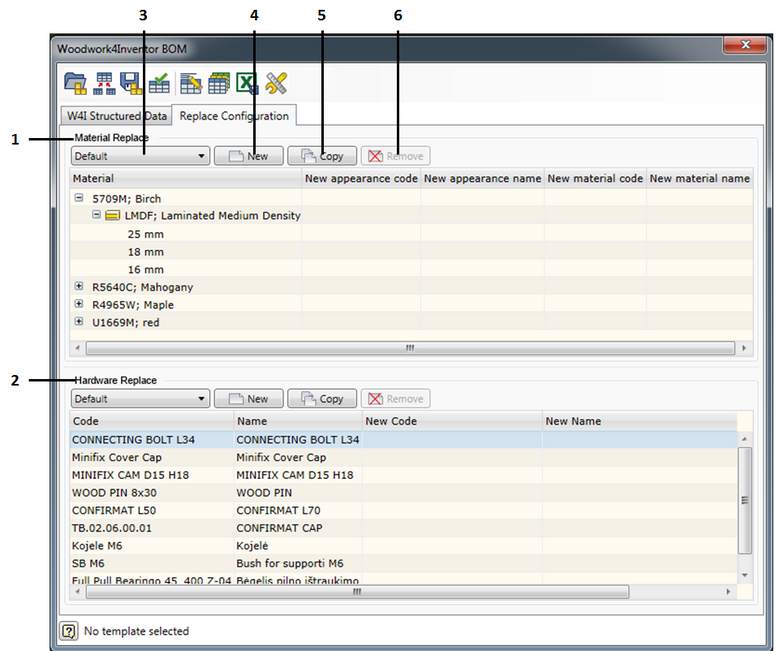
The window is divided into the following two areas:
1. Replacement configuration for materials.
2. Replacement configuration for hardware (purchased products).
The buttons used to adjust the configurations being saved are arranged in each of the areas:
3. Default - selecting a current configuration.
4. New - creating a new replacement configuration.
5. Copy - copying a replacement configuration.
6. Remove - removing the current replacement configuration.
Replacement configuration for materials
The following columns are displayed in the material replacement adjustment window:
Material - a material summary window in which materials are hierarchically grouped by levels:
|
The first level - indicates that the materials having the same color are gathered in this level. |
|
The second level - indicates that the materials having the same material are gathered in this level. |
The third level - indicate that the materials having the same thickness are gathered in this level. |
The fourth level - indicates that the materials having the same width, if such is applicable. |
Depending on the type of the material, the material can have no color (see Replacements section). In such case the display of the material will be moved by one level. Moreover, Solid materials are not differentiated by geometric parameters, thus they do not have lower levels.
| • | New Appearance Code - allows entering a new appearance code. |
| • | New Appearance Name - allows entering a new appearance name. |
| • | New Material Code - allows entering a new material code. |
| • | New Material Name - allows entering a new material name. |
To enter a replacement value, place the cursor on the field in which you want to enter the text and single click the right mouse button or press the “F2” function key. Then you can enter a required replacement value in this field. Then double-click the mouse button to open a value replacement window from the MS Excel worksheet (see section Entering replacement values from the MS Excel worksheet) via which the replacement will be performed.
If a replacement is performed on a higher level, the value of this replacement is transferred to all lower-level lines as long as an individual replacement is not made to the value of a lower level.
Materials for which the “color” attribute is not used in their description, does not have an option of editing the New Appearance Code and New Appearance Name column values, thus they are seen in grey.
If the user does not enter a new value in the indicated fields, materials and appearances are exported without any changes.
Replacement configuration for hardware (purchased products)
The hardware replacement adjustment window contains the same replacement configuration adjustment commands:
| • | Default - selecting a current configuration |
| • | New - creating a new replacement configuration. |
| • | Copy - copying a replacement configuration. |
| • | Remove - removing the current replacement configuration. |
The hardware replacement adjustment window has the following columns:
| • | Code - hardware component code. |
| • | Name - hardware component name. |
| • | New Code - entering a new hardware code. |
| • | New Name - entering a new hardware name. |
To enter a replacement value, place the cursor on the field in which you want to enter the text and single click the right mouse button or the “F2” function key. Then you can enter a required replacement value in this field. Then double-click the mouse button to open a value replacement window from the MS Excel worksheet (see section Entering replacement values from the MS Excel worksheet) via which the replacement will be performed.
If the user does not enter a new value in the indicated fields, materials and appearances are exported without any changes.