During the copying or renaming process, you can use different renaming schemes for the assembly components. Keep in mind that during the copying/renaming process, the assembly is transferred within the limits of the same Autodesk Inventor project, with an exception of Pack and Go. Therefore, components within the Content Center and Library paths are not included in this copying/transfer procedure. These components exist in the assembly as re-usable components.

As you can see in the figure above, a component representation field contains several columns defining selected assembly components. A darker area marks an active column (highlighted in red frame). All value renaming manipulations are performed in an active column. The changes to the active column are made by selecting any item that you want to activate in the column using the cursor. In this way you can apply different renaming schemes to each individual column.
Currently, the Assembly Copier supports the following component renaming schemes:
| 1. | Prefix/Sufix & Counter - Selects prefix and suffix and component counter. |
| 2. | Replace - Replaces text found in a line with a different text. |
| 3. | Tree Counter - renames by using a hierarchy counter. |
![]() Prefix/Suffix selection & Counter
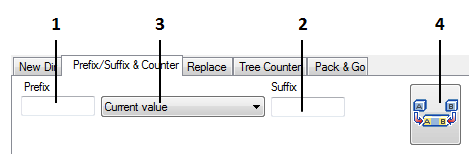
Prefix/Suffix selection & Counter
If you select this tab, you can specify the following for the value found in the column
1. Prefix.
2. Suffix.
3. The following options can be selected: a. Current value - a found value will be taken and attached to a specified prefix or suffix. b. Counter - a counter value will be inserted between the specified suffix and / or prefix. If you select a counter, then additional window will appear where you can specify the starting number for the counter. The counter is counted from the first selected component down as arranged in the Assembly Copier content window, each time attaching one unit per each subsequent component. c. Nothing - no value is inserted between the prefix and suffix.
4. Starting the renaming process based on the created scheme. After clicking this button, the renaming scheme will appear in the active column and will be applied to selected components.
|
![]() Replace - Replaces text found in a line with a different text
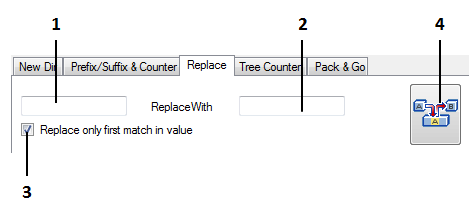
Replace - Replaces text found in a line with a different text
If you select this tab, you can perform text search for the found line in the column and replace the found text with a different text.
1. Text being searched. 2. Text being replaced. 3. Condition – search for first match in text line. Otherwise, the same match will be searched in the next line. 4. Starting the renaming process by replacing the found matches.
|
![]() Tree Counter - renaming by applying the hierarchy counter
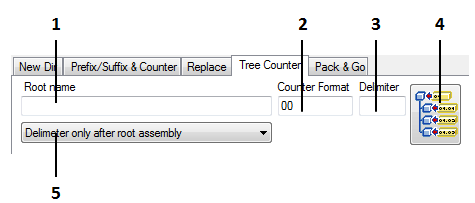
Tree Counter - renaming by applying the hierarchy counter
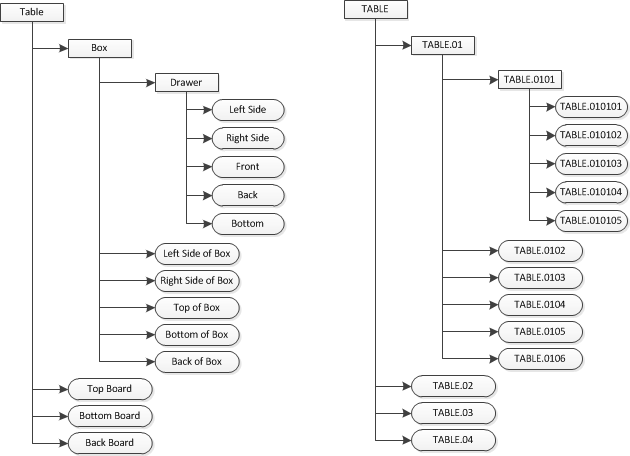
If you select this tab, you can automatically number items based on the assembly hierarchy. As seen in the example below, each assembly level is numbered in sequential order based on the parent component number.
1. Root name - new name of the highest level component. 2. Counter Format - counter start number. 3. Delimiter – delimiting character between hierarchy levels. The character is placed depending on the delimiter character placement conditions (see point 5 below) 4. Starting the renaming process by assigning hierarchy names. 5. Delimiter character placement conditions. There are three available options: a. Without delimiter - the delimiter is not placed. b. Delimiter only after root assembly - the delimiter is placed only after the new name of the highest level component. c. Delimiter for each subassembly - the delimiter is placed after each number level. For example, in the given example, the new name of the lowest level component would look like this: TABLE.01.01.01
|
![]() Copying values from one column to another
Copying values from one column to another
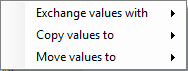
If you want to move the values from one column to another or to exchange values between columns, you can do it by simply placing the cursor on the column header and right-clicking on it to open a contextual menu. You will see the following contextual menu:
1. Exchange values with - exchanges values between the active column and the value of the selected displayed column. 2. Copy values to - copies the values from the active column to a specified column. 3. Move values to - copies the values from the active column to a specified column. Clears fields of the active column.
The structure of the displayed columns depends on the configuration of the Assembly Copier options.
|
![]() Changing individual item value
Changing individual item value
If you want to change individual column values, you can do it by simply doubling clicking on the selected item or by pressing the "F2" key. This will active a text editing window and you will be able to enter your desired value using your keyboard.
|