System settings allow the user to adjust the operation settings of the Woodwork for Inventor add-on
To open the command, go to:
Woodwork Design –> Help –> Settings ![]()
The command has four tabs used to adjust the following operational aspects of Woodwork for Inventor:
1. Prefix for Code - sets prefix for the code. Workpiece - field used to indicate a desired prefix for the workpiece code. In Woodwork for Inventor, each part consists of workpieces (click here for more information). These workpieces automatically acquire the same code as that of the part including an additional prefix the meaning of which is entered in the field described herein. Composite Material - field used to indicate a desired prefix for the code of the part workpiece glued from other parts. Woodwork for Inventor part workpieces can be designed from several parts consisting of workpieces (click here for more information). These workpieces automatically acquire the same code as that of the material assigned to it including an additional prefix the meaning of which is entered in the field described herein.
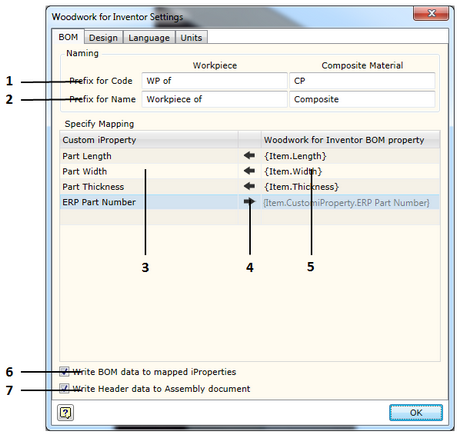
2. Prefix for Name - sets prefix for the name. Workpiece - field used to indicate a desired prefix for the workpiece name. In Woodwork for Inventor, each part consists of workpieces (click here for more information). These workpieces automatically acquire the same name as that of the part including an additional prefix the meaning of which is entered in the field described herein. Composite Material - field used to indicate a desired prefix for the name for the part workpiece glued from other parts. Woodwork for Inventor part workpieces can be designed from several parts consisting of workpieces (click here for more information). These workpieces automatically acquire the same name as that of the material assigned to it including an additional prefix the meaning of which is entered in the field described herein. Woodwork for Inventor has an option of writing different data created during BOM generation in parts from the model of which this data was calculated. Examples would include part length or part width. On another hand, you can indicate to the system that the data written in the part as Custom iProperty can be included in a BOM. This is performed by providing a data field linking map in the Specify Mapping area.
The figure provided shows how the calculated part size is returned to the part Custom iProperty fields. In the last line, the datum from the ERP system may be included in the BOM using the keyword on the right. 6. Write BOM data to mapped iProperties – sets the option which, at the time of closing the Woodwork for Inventor BOM generator, writes values for the components generated during the operation of the BOM generator in the fields created by the user (Custom iProperties). Such option is left in order for the user to be able to turn off the writing of data to the said fields each time the user closes the BOM generator in case the user’s computer has weaker configuration. 7. Write Header data to Assembly document - sets the option using which the data contained in the BOM and described as a BOM header can be written to the assembly component from which the BOM itself was generated. This allows exporting this data to drawings after starting the Auto Plot function.
|
Materials Database path - specifies the location in which the Woodwork for Inventor material database is placed. Its default location is: C:\Users\Public\Documents\Woodwork for Inventor 2014 v5\Materials.sdf
If the company has several constructors, it is recommended that the database be kept centralized. In this case the database will be placed on the server and the user will have to specify the server path to the database.
Straight edge pre-mill allowance - allowance for precision milling operation (before performing edge banding). If the edge banding machine has a precision milling tool, you may indicate a permanent allowance based on which the part edge will be milled before applying the edge band. This allowance is taken into consideration when calculating the dimensions of the part workpiece being cut. The allowance indicated in this field applies to straight edge banded edges of the part. Arc edge pre-mill allowance - allowance for precision milling operation (before performing edge banding). If edge banding is performed using the CNC machine and precision milling is performed prior to applying the edge band, you may indicate a permanent allowance based on which the part edge will be milled before applying the edge band. This allowance is taken into consideration when calculating the dimensions of the part workpiece being cut. The allowance indicated in this field applies to arc edges of the part.
If pre-milling is selected for both types, it means that the pre-milling values of both types of edges will be taken into consideration. The default pre-milling values is 0.0.
Pre-mill allowance equals to edge band thickness - this option enables the mode where the workpiece is equal to the part dimensions. In other words, the workpiece will always be cut in the same size as that of the part with edge bands. This work scheme is used when precision milling value is set in the machine based on the thickness of the edge band being applied.
Covers highlight color by thickness range - colors used to highlight covers are set in the table depending on the thickness of the covers. Highlight is used in the (Material Assignment) command, in the cover placement branch. In the Thickness column, you have to indicate the cover thickness up to which the covers found in the model will be highlighted in the color specified in the Color column. Out of Range means that the colors outside of the indicated range will be highlighted with a specified color. Colors are defined in the system. Workpiece color - the color used to represent the workpiece in the oversize control command. Workpiece oversize color - the color used to represent the workpiece oversize in the oversize control command. Gathering tangentially connected faces in Edge Banding operation - this option enables a mode in which all tangentially connected faces are automatically gathered during edge banding operation. Gathering tangentially connected faces in Veneering operation - this option enables a mode in which all tangentially connected faces are automatically gathered during veneering operation.
|
In this section you may select the language for Woodwork for Inventor. To enable the selected language, you have to close and re-start the Autodesk Inventor program.
|
In this window you will see a unit settings dialog presented in the form of a hierarchical tree structure.
Units are displayed in the form of a hierarchical tree. Unit settings selected in the higher level will apply to lower branches as well if not otherwise specified in the lower branch. The hierarchical tree is divided into the following levels:
The first level:
The second level describes the following:
In the third level, you may adjust unit display for specific types of materials:
In the fourth level, you may describe the following for each material type:
The user may save the settings to the external file and transfer them to the system.
The installation of the Woodwork for Inventor add-on offers the following two configurations:
|