Simple kitchen cabinet modeling |
  
|
Simple kitchen cabinet modeling |
|
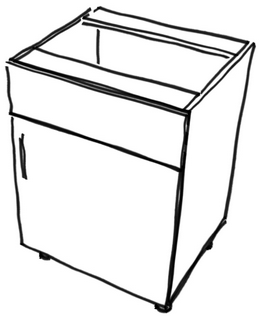
Let's design simple kitchen cupboard, by using Multi Body Master Part Method as shown in the figure below.
Before doing that, you have to have mastered the Autodesk Inventor features, and we omit a detailed explanation on how to achieve the result of the example provided.
1. Start a new part design.  and select a Standard.ipt template
2. Create a box solid body a size of 600x560x750. This box will be a Solid Body which drives the whole geometry of cabinet parts. It should be noted that box coordinates should be related to the parts Origin coordinate system. If the designed piece of furniture is symmetric, it is good practice to relate its sketch to Parts Origin as a symmetrical shape. This is especially this is important if we are using the Multi Body Master modeling method.
3. Create a Bottom Part body of the kitchen cabinet. For this purpose we need to create a sketch which is based on the Main Volume body and create a new body. Don't forget to rename it. The name should be the same as part name, because this name will be transferred to the part file name when product assembly will be created by the Make Components command.
4. Let's create the rest parts bodies in the same way as the Bottom Part body.
5. Make the cabinet assembly.
6. Final editing of the parts in the assembly.
The cabinet assembly part modeling is done. It should be noted that this cabinet is a fully parametric model controlled by the sketch. Now you can apply materials and place furniture hardware. You can learn how to do it with Woodwok4Inventor in the Material assignment command description.